
This post explains how to create files that can be used by the ADX2 plug-in for Unity to play sounds in your game.
Understanding the data hierarchy
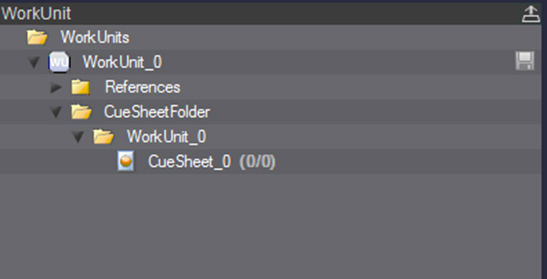
First let’s see what kind of data ADX2 is manipulating. In AtomCraft – ADX2’s authoring tool – a project is divided into Work Units. These are non-run-time objects whose purpose is simply to organize the projects in chunks, so that tasks can be distributed between several sound designers if needed.
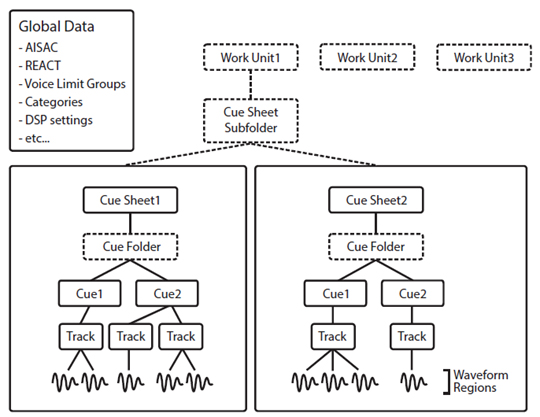
Work Units can contain one or more CueSheets. These are the equivalent of sound banks in some other middleware, and CueSheets are actually what will be exported towards the game (more on that below). Each CueSheet contains Cues. Typically, you will divide your Cues into CueSheets based on the locations in the game, the characters, the objects etc.
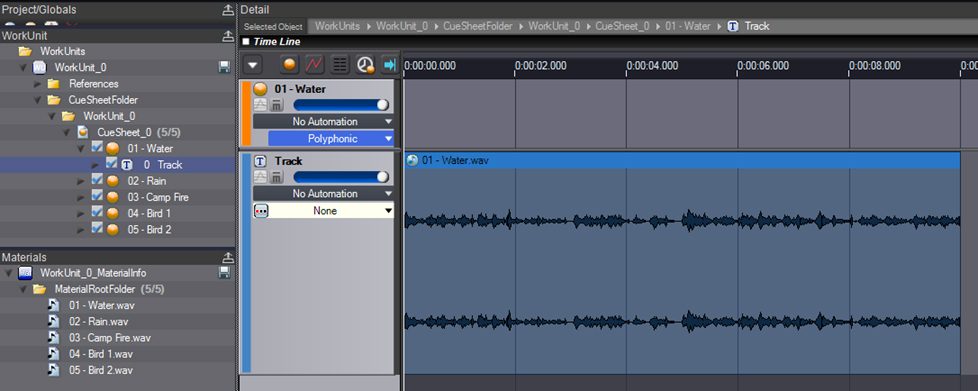
A Cue defines what sound is played and how it is played. A Cue is composed of one or more Tracks, and has a timeline on which Waveform Regions (i.e. sample data with some extra parameters) can be arranged.
In ADX2, the samples are called Materials. Imported as WAVE or AIFF files, they will of course also be exported towards the game after being encoded.
Finally, at the project level, Categories, Voice Limit Groups, REACT (automatic ducking), AISAC (real-time control parameters), DSP buses and more can be defined to control and manage groups of Cues at run-time. We will talk more about all this in future posts.
Authoring audio data
Creating a basic project to test the integration of ADX2 with Unity is surprisingly easy. Actually, let’s do this now!
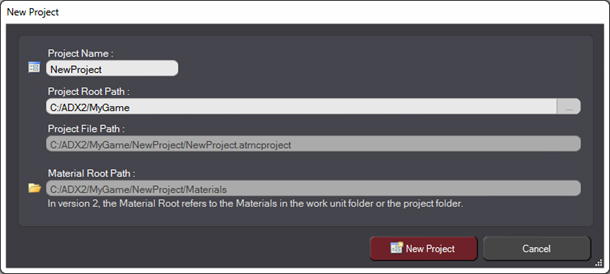
When you create a new project in AtomCraft you have to select the folder in which you want the files to be saved. This also determines the path of the Material Root, under which all the audio Materials will be stored.
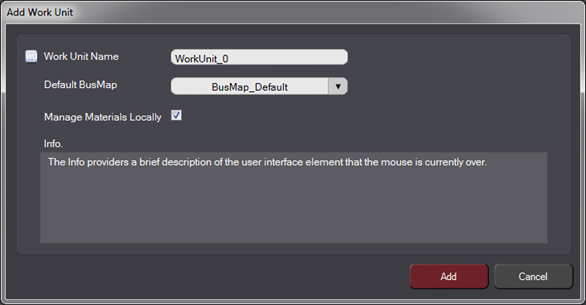
Once the project created, AtomCraft will ask you the name of the WorkUnit that will automatically be added for you. You can also specify if the materials of that WorkUnit should be stored in the global Material folder or in a separate, local folder, and what the default BusMap for the mixer should be. You can keep all the default settings for now and simply click on the “Add” button.
The WorkUnit is created and you can see that a CueSheet has also been automatically added to it.
Now we just need to add some Cues. For this test project, we will simply drag and drop a few wave files directly on the CueSheet. Several things will happen automatically:
-
- The wave files will be registered as Materials and appear in the Materials tree.
- A Cue will be created for each wave file you dropped on the CueSheet.
- A Track will be added to the Cues and a Waveform Region containing the corresponding sample will appear on their timeline.
This means that we are already done and ready to export the data towards Unity!
Exporting the data towards Unity
Let’s give a look at the picture below, which details what becomes of the data in an AtomCraft project when it is exported to a game.
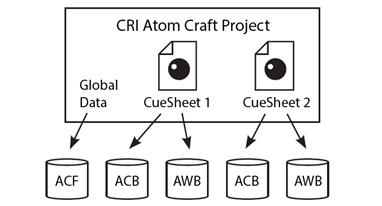
Three main types of files are created:
-
-
-
- The ACF (for Atom Configuration File) contains all the global information about a project as well as the list of CueSheets it includes. This is the typical “project file” and it is usually unique for a game.
- The ACB files (for Atom CueSheet Binary) contain all the parameters of a specific CueSheet as well as any sample data destined to be played from memory by the Cues in that CueSheet. If the audio is expected to be streamed, it is stored in the third type of file which is…
- The AWB file (for Atom Wave Bank). It contains the encoded data for the streams referenced by the CueSheet of the same name (the parameters for the streams themselves are still stored in the ACB file). If all the sound data in the CueSheet is set up to play from memory instead of being streamed, then no AWB file is generated.
-
-
With this information in mind, it is time for us to export our project! To do so, go to the Build menu of AtomCraft and select the “Build Atom CueSheet Binary…” command. The following window appears:
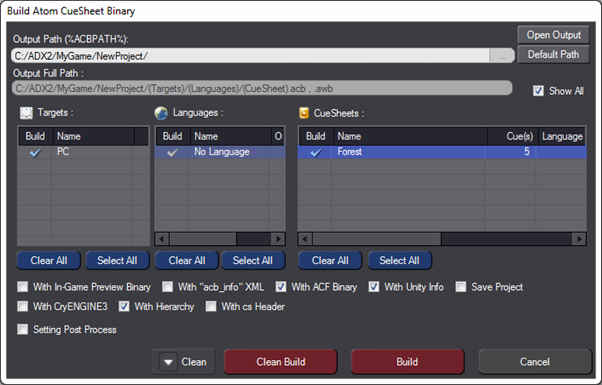
You will notice that we renamed our CueSheet to something a bit less vague (to do so, right-click on the CueSheet and use the “Rename” function).
You can also see that when you build, the language and target platform will be taken into consideration, and therefore the files exported will be different based on these settings. Since we didn’t add any, the default settings will do just fine.
Make sure your CueSheet is selected and click on the “Build” button. Once the build is completed, the dialog below will appear:
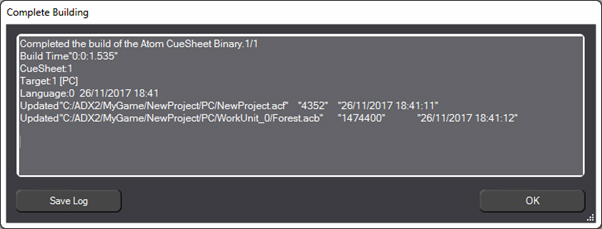
An ACF project file was successfully created, as well as an ACB file for our CueSheet. Since the default settings specify in-memory playback, no AWB file was created.
Now that we know how to generate audio data for the ADX2 plug-in, in the next post we will see how easy it is to play it in Unity!